오늘은 class에 대해서 배워보도록 하겠습니다
| 목차 | |
| 1. | array 복습 |
| 2. | try ~ catch |
| 3. | class |
| 4. | 예제 문제 |
| 5. | 느낀 점 |
1. array 복습
<!DOCTYPE html>
<html lang="en">
<head>
    <meta charset="UTF-8">
    <meta name="viewport" content="width=device-width, initial-scale=1.0">
    <title>Document</title>
</head>
<body>
    <script>
        const memberObject = {
            name: 'hong',
            age: 30,
            married: true,
            favors: ["Baseball", "Game", "Movie", "etc..."]
        };

        const memberObject2 = {
            name: 'kim',
            age: 25,
            married: false,
            favors: ["Coffee", "Dog", "Movie", "etc..."]
        };

        const member = [];
        member.push(memberObject);
        /*
        console.log(member);
        console.log(member);
        // memberObject를 3개 복사하여 저장
        for(let i = 0; i < 3; i++){
            member.push(memberObject);
        }
        console.log(member);
        // 2번째 member를 kim으로 변경
        member[1].name = 'kim';
        console.log(member);
        // memberObject는 하나의 객체 (다 똑같은 객체 -> class 생성)
        */
        member.push(memberObject2);
        console.log(member);

        // 객체의 값을 전부 분해하여 콘솔에 찍기
        // for of : 배열의 내용을 탐색할 때
        // for in : 객체 안의 내용을 탐색할 때
        // 객체 값을 출력 객체명[키명] = value 리턴
        console.log(member[0].name);
        console.log("-- 배열 객체 --");
        for(let mem of member){
            // 첫 번째 member 객체 값
            for(let keyName in mem){
                if(keyName == 'favors'){
                    console.log('--취미--');
                    for(let f of mem[keyName]){
                        console.log(f);
                    }
                }else{
                    console.log(keyName+" : "+mem[keyName]);
                }
            }
        }
    </script>
</body>
</html>
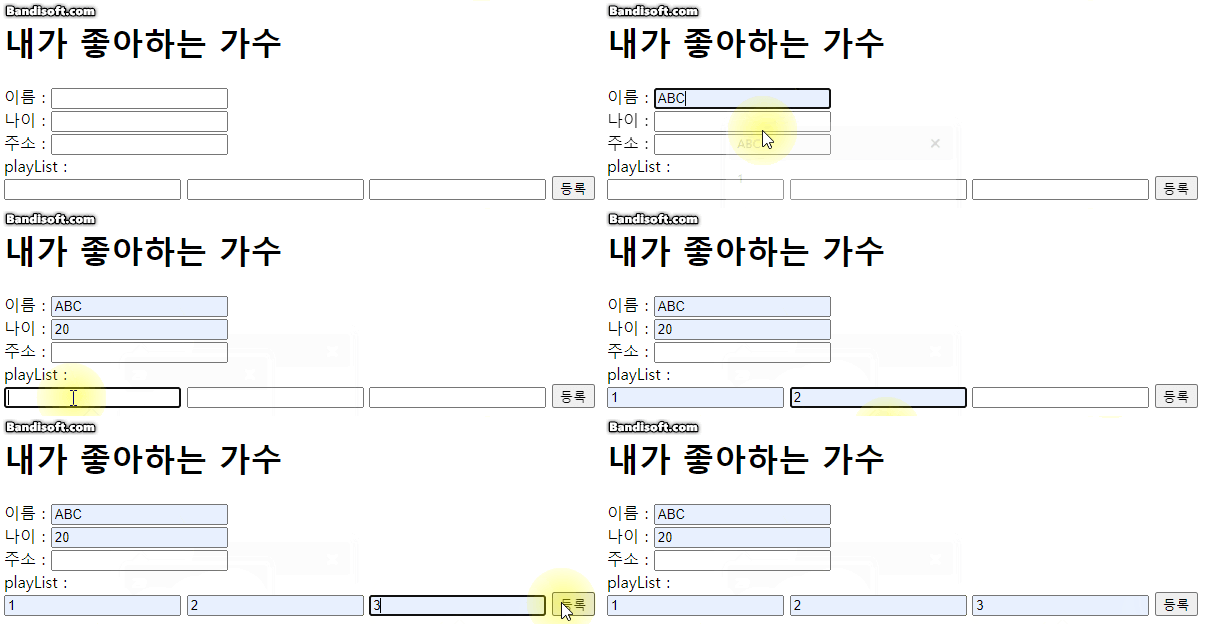
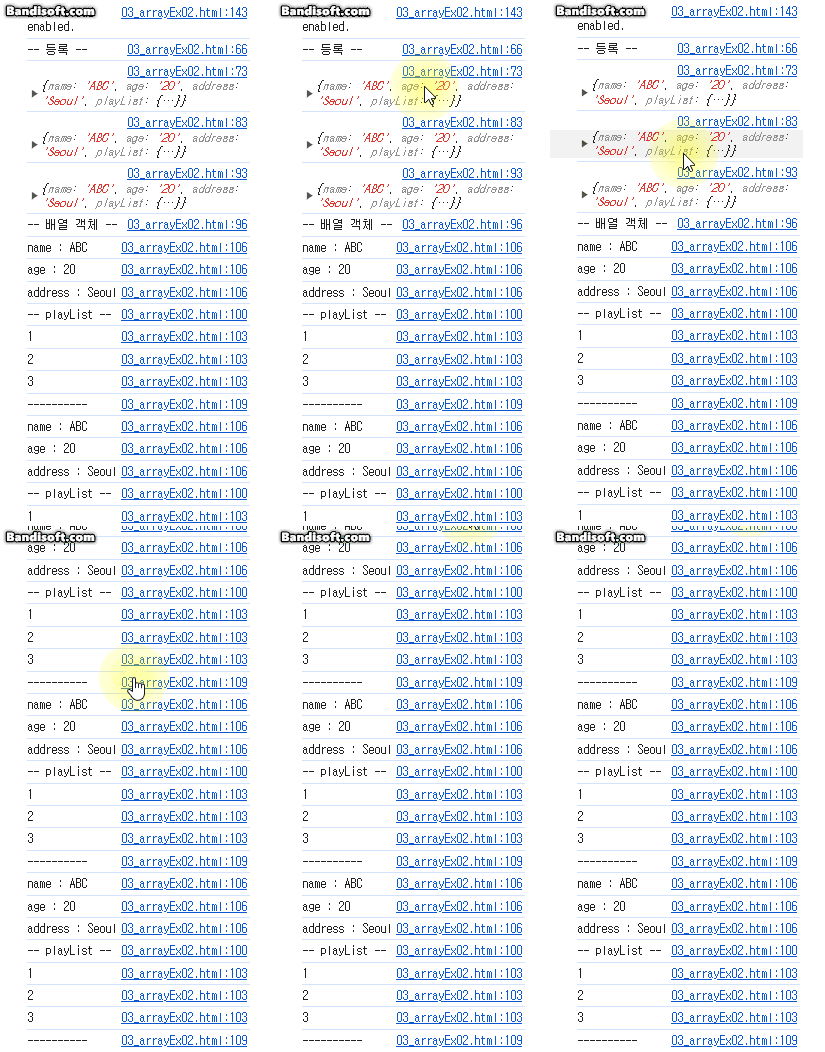
▷ 출력

▣ 리스트 출력하기
<!DOCTYPE html>
<html lang="en">
<head>
    <meta charset="UTF-8">
    <meta name="viewport" content="width=device-width, initial-scale=1.0">
    <title>Document</title>
</head>
<body>
    <h1>내가 좋아하는 가수</h1>
    <form action="">
        이름 : <input type="text" id="name"><br>
        나이 : <input type="text" id="age"><br>
        주소 : <input type="text" id="address"><br>
        playList : <br>
        <input type="text" id="first">
        <input type="text" id="second">
        <input type="text" id="third">
        <button type="button" id="add">등록</button>
    </form>
    <script>
        const people = [];
        const musician1 = {
            name : '',
            age : 0,
            address : '',
            playList : {
                first : '',
                second : '',
                third : '',
            }
        }
        const musician2 = {
            name : '',
            age : 0,
            address : '',
            playList : {
                first : '',
                second : '',
                third : '',
            }
        }
        const musician3 = {
            name : '',
            age : 0,
            address : '',
            playList : {
                first : '',
                second : '',
                third : '',
            }
        }

        let cnt = 0;
        // people에 객체를 3개 등록
        document.getElementById('add').addEventListener('click', ()=>{
            cnt ++;
            const name = document.getElementById('name').value;
            const age = document.getElementById('age').value;
            const address = document.getElementById('address').value;
            const first = document.getElementById('first').value;
            const second = document.getElementById('second').value;
            const third = document.getElementById('third').value;

            switch(cnt){
                case 1:
                    console.log('-- 등록 --');
                    musician1.name = name;
                    musician1.age = age;
                    musician1.address = address;
                    musician1.playList.first = first;
                    musician1.playList.second = second;
                    musician1.playList.third = third;
                    console.log(musician1);
                    people.push(musician1);
                    break;
                case 2:
                    musician2.name = name;
                    musician2.age = age;
                    musician2.address = address;
                    musician2.playList.first = first;
                    musician2.playList.second = second;
                    musician2.playList.third = third;
                    console.log(musician1);
                    people.push(musician2);
                    break;
                case 3:
                    musician3.name = name;
                    musician3.age = age;
                    musician3.address = address;
                    musician3.playList.first = first;
                    musician3.playList.second = second;
                    musician3.playList.third = third;
                    console.log(musician1);
                    people.push(musician3);
                    // 3명의 데이터를 콘솔에 for문으로 순회 나열
                    console.log("-- 배열 객체 --");
                    for(let result of people){
                        for(let keyName in result){
                            if(keyName == 'playList'){
                                console.log('-- playList --');
                                // 다시 객체 안
                                for(let key in result[keyName]){
                                    console.log(result[keyName][key]);
                                }
                            }else{
                                console.log(keyName + ' : ' + result[keyName]);
                            }
                        }
                        console.log('----------');
                    }
                    break;
            }
        });
    </script>
</body>
</html>
▷ 출력


2. try ~ catch
<!DOCTYPE html>
<html lang="en">
<head>
    <meta charset="UTF-8">
    <meta name="viewport" content="width=device-width, initial-scale=1.0">
    <title>Document</title>
</head>
<body>
    <h1>
        try~catch : 예외 처리 프로세스
        예상되는 에러를 try{code...} 영역에 배치를 하고, 만약 에러가 발생하면,
        catch(err){code...} 영역에서 처리하는 예외처리 프로세스
    </h1>
    <ul>
        <li>
            try 영역 : 에러가 발생할 수 있는 코드를 실행
            자바 스크립트에서 에러가 발생하면 에러 발생 라인부터 동작이 멈춤.
            에러가 발생해도 다음 코드로 넘어감
        </li>
        <li>
            catch(err){ } : 에러가 발생하면 예외처리를 하는 곳
        </li>
        <li>
            try~catch로 예외처리를 하면 프로세스가 멈추지 않고, 지속시킬 수 있음
        </li>
        <li>
            finally 영역: 예외처리와 상관없이 무조건 실행되어야 하는 코드를 넣는 영역
        </li>
        <li>
            throw : 예외를 고의적으로 발생시키는 키워드 throw + 예외발생 후 처리코드
        </li>
    </ul>
    <script>
        console.log('프로세스 시작');
        let num = 0;
        try{
            alert('경고창');
            throw new '경고창 에러시 문구';
            console.log(10 + num);
            console.log(10 - num);
        }catch(err){
            console.log(err.name);
            console.log(err.message);
        }finally{
            console.log("꼭 출력되어야 하는 문구");
        }
    </script>
</body>
</html>
▷ 출력

3. class
<!DOCTYPE html>
<html lang="en">
<head>
    <meta charset="UTF-8">
    <meta name="viewport" content="width=device-width, initial-scale=1.0">
    <title>Document</title>
</head>
<body>
    <h1>
        클래스, 생성자, 객체
    </h1>
    <!--
        클래스는 생성 기본 문법
        - 클래스는 반드시 첫 글자 대문자
        class MyClass{
            //생성자 : 자바 스크립트의 생성자는 1개만 허용
            constructor(param){
                ...
            }
            //method 정의
            methodName(param){
                ...
            }
            methodName(param){
                ...
            }
            // getter / setter
            get name() {
                return this.name;
            }
            set name(value){
                this.name = value;
            }
        }
    -->

    <script>
        class Car{
            constructor(name, year){
                this.name = name;
                this.year = year;
                this.model = '';
            }
        }
        let myCar1 = new Car('쏘나타', 2023);
        myCar1.model = "XG";
        console.log(myCar1);
        let myCar2 = new Car('그랜저', 2022);
        console.log(myCar2);
        let myCar3 = new Car();
        myCar3.name = '아반떼';
        myCar3.year = 2024;
        myCar3.model = 'XD';
        consol.log(myCar3);
    </script>
</body>
</html>
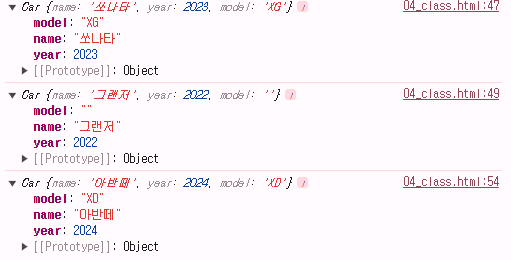
▷ 출력

<!DOCTYPE html>
<html lang="en">
<head>
    <meta charset="UTF-8">
    <meta name="viewport" content="width=device-width, initial-scale=1.0">
    <title>Document</title>
</head>
<body>
    <script>
        // class 객체 생성 / 일반 객체 생성
        // 계좌 이름, 금액, 입금, 출금, 이체

        // 일반 객체 생성
        const myAccount = {
            name : 'hong',
            balance : 0,
            //입금
            deposit: function(amount){
                this.balance += amount; // 누적
            },
            //출금
            withdraw: function(amount){
                this.balance -= amount;
            },
            //이체
            transfer: function(amount, otherAccount){
                this.balance -= amount;
                otherAccount.balance += amount;
            }
        }

        const yourAccount = {
            name : 'kim',
            balance : 10000,
            //입금
            deposit: function(amount){
                this.balance += this.amount; // 누적
            },
            //출금
            withdraw: function(amount){
                this.balance -= amount;
            },
            //이체
            transfer: function(amount, otherAccount){
                this.balance -= amount;
                otherAccount.balance += amount;
            }
        }
        console.log(myAccount.name, ":", myAccount.balance);
        myAccount.deposit(10000);
        console.log(myAccount.name, ":", myAccount.balance);
        myAccount.withdraw(3000);
        console.log(myAccount.name, ":", myAccount.balance);
        myAccount.transfer(2000, yourAccount);
        console.log(myAccount.name, ":", myAccount.balance);
        console.log(yourAccount.name, ":", yourAccount.balance);
        console.log('--------------------');

        //class로 객체 생성
        class BankAccount{
            constructor(name, balance){
                this.name = name;
                this.balance = balance;
            }
            //입금
            deposit(amount){
                this.balance += amount; // 누적
                return this.balance;
            }
            //출금
            withdraw(amount){
                this.balance -= amount;
                return this.balance;
            }
            //이체
            transfer(amount, otherAccount){
                this.balance -= amount;
                otherAccount.balance += amount;
                return this.balance;
            }
        }
        let leeAcc = new BankAccount('lee', 5000);
        let choiAcc = new BankAccount('choi', 10000);
        console.log(leeAcc.name, ":", leeAcc.balance);
        console.log(choiAcc.name, ":", choiAcc.balance);
        console.log(leeAcc.deposit(10000));
        console.log(leeAcc.name, ":", leeAcc.balance);
        console.log(leeAcc.withdraw(3000));
        console.log(leeAcc.transfer(10000, choiAcc));
        console.log(choiAcc.name, ":", choiAcc.balance);
    </script>
</body>
</html>
▷ 출력

◈ get, set
<!DOCTYPE html>
<html lang="en">
<head>
    <meta charset="UTF-8">
    <meta name="viewport" content="width=device-width, initial-scale=1.0">
    <title>Document</title>
</head>
<body>
    <script>
        // 생성자 함수 : 클래스의 함수화
        // class, 생성자함수, 객체
        // 일반 함수와 생성자 함수는 별반 차이가 없음.
        // 1. 반드시 new를 통해 실행
        // 2. 반드시 함수 첫 글자를 대문자로 시작

        class PersonClass{
            constructor(first, last, age, addr){
                this.firstName = first;
                this.lastName = last;
                this.age = age;
                this.addr = addr;
            }

            get personInfo(){
                return `${this.firstName}, ${this.lastName} (${this.age}) : ${this.addr}`;
            }
        }
        // get을 호출시 ()가 없음.
        const my = new PersonClass('kim', 'minji', 20, 'seoul');
        console.log(my);
        console.log(my.personInfo);

        // 위의 클래스를 생성자 함수로 변환
        function PersonObject(first, last, age, addr){
            this.firstName = first;
            this.lastName = last;
            this.age = age;
            this.addr = addr;
            this.getPersonInfo = function(){
                return `${this.firstName}, ${this.lastName} (${this.age}) : ${this.addr}`;
            }
        }

        const my2 = new PersonObject('lee', 'minji', 23, 'seoul');
        console.log(my2);
        console.log(my2.getPersonInfo());

        // 객체로 생성
        const person = {
            firstName: '',
            lastName: '',
            age: '',
            address: '',
            setInfo: function(first, last, age, addr){
                this.firstName = first;
                this.lastName = last;
                this.age = age;
                this.addr = addr;
            },
            get personInfo(){
                return `${this.firstName}, ${this.lastName} (${this.age}) : ${this.addr}`;
            },
            set setFirstName(first){
                this.firstName = first;
            }
        };
        person.setInfo('park', 'minji', 25, 'seoul');
        console.log(person);
        // get, set은 둘 다 ()가 없음.
        console.log(person.PersonInfo);
        // set 설정
        person.setFirstName = 'lee';
        console.log(person.PersonInfo);
    </script>
</body>
</html>
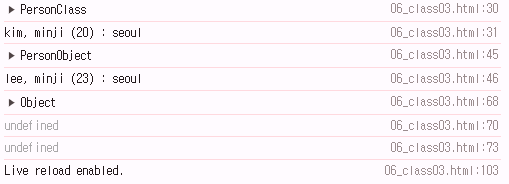
▷ 출력

▣ 나이 출력
<!DOCTYPE html>
<html lang="en">
<head>
    <meta charset="UTF-8">
    <meta name="viewport" content="width=device-width, initial-scale=1.0">
    <title>Document</title>
</head>
<body>
    <script>
        // class User 생성
        // name, birth를 받아서 멤버변수로 저장
        // get age() 나이를 리턴
        // status() 성인인지 미성년자인지 리턴 (콘솔에 출력)
        let day = new Date();
        today = Number(day.toLocaleDateString());
        let check = 0;

        class User{
            constructor(name, birth){
                this.name = name;
                this.birth = birth;
            }

            get age(){
                let birthday = new Date(this.birth);
                let todayYear = new Date().getFullYear();
                return todayYear - birthday.getFullYear();
            }
            status(){
                if(this.age < 20){
                    return '미성년자';
                }else{
                    return '성인';
                }
            }

        }
        const hong = new User('hong', '2009-09-30');
        console.log(hong.age);
        console.log(hong.status());

        const kim = new User('kim', '1990-01-01');
        console.log(kim.age);
        console.log(kim.status());
    </script>
</body>
</html>
▷ 출력

4. 예제 문제
◎ 문제
▶ 1번

◎ 정답
▶ 1번
<!DOCTYPE html>
<html lang="en">
<head>
    <meta charset="UTF-8">
    <meta name="viewport" content="width=device-width, initial-scale=1.0">
    <title>Document</title>

</head>
<body>
    <!-- 구구단 문제 -->
     <h1>
        <button type="button" id="startBtn">문제출제</button>
     </h1>
     <ol id="q"></ol>
     <h1>
        <button type="button" id="compareBtn">정답확인</button>
     </h1>
     <h3 id="printRatio"></h3>

     <script>
        //input.style.backgroundColor = 'green'
        //style을 객체의 속성으로 줄 때 camelCase로 변경하여 속성을 줌.
        //정답 Object ans1 ans2 ...
        const ansObj = {}; //정답을 담을 객체
        //ansObj[`ans${i}`] = dan * incre;
        let quizArea = document.getElementById('q');
        let count=0; //전체개수
        let correct = 0; //정답개수

        document.getElementById('compareBtn').addEventListener('click',()=>{
            correct=0;
            count=0;

            while(count < 10){
                count++;
                // let userInput = document.getElementById(`userAns${count}`);
                let userInput = document.getElementById('userAns'+count);
                if(userInput.value == ansObj[`ans${count}`]){
                    correct++;
                    userInput.value += " : 정답!!";
                    userInput.style.backgroundColor = 'green';
                }else{
                    userInput.value += " : 오답!!";
                    userInput.style.backgroundColor = 'red';
                }
            }
            document.getElementById('printRatio').innerText =
            `정답갯수 : ${correct}, 정답률 : ${(correct/count).toFixed(2)*100}%`;
        });

        document.getElementById('startBtn').addEventListener('click',()=>{
            count=0;
            document.getElementById('printRatio').innerText = "";
            let q = '';
            do{
                count++;
                let dan = Math.floor(Math.random()*8)+2;
                let incre = Math.floor(Math.random()*9)+1;
                let answer = dan * incre;
                ansObj[`ans${count}`] = answer;  //object에 정답 추가
                //값 뿌리기
                 q+= `<li>${dan} * ${incre} = <input type="text" id="userAns${count}"> </li>`;
            }while(count < 10);
            quizArea.innerHTML = q;
            console.log(ansObj);
        });

     </script>

</body>
</html>
5. 느낀 점
구구단 문제를 풀 때 innerHTML를 이용해 input을 여러 개 생성을 하려는 파트에서 똑같은 id가 여러 개이면 인지를 못한다는 점을 몰라서 제대로 풀 지 못했었다. 오늘 내용을 복습하면서 ``, ${}를 중심으로 공부해야겠다고 생각했다.
'Front-end > Js' 카테고리의 다른 글
| Js 기초(BOM, DOM, classList)- AWS 풀스택 과정 23일차 (0) | 2024.08.14 |
|---|---|
| Js 기초(JSON, AJAX)- AWS 풀스택 과정 22일차 (0) | 2024.08.13 |
| Js 기초(set, map)- AWS 풀스택 과정 20일차 (0) | 2024.08.09 |
| Js 기초(array)- AWS 풀스택 과정 19일차 (0) | 2024.08.08 |
| Js 기초(if, for)- AWS 풀스택 과정 18일차 (0) | 2024.08.07 |